How To Read A Twist Angle
A twist angle indicates the rotational position of a hose fitting in relation to a reference point. Use the interactive viewer below to visualise the required angular alignment for custom hose assemblies.
Tip: take a screenshot of the selected angle and include it with your hose enquiry.
What Is On Our ID Bands
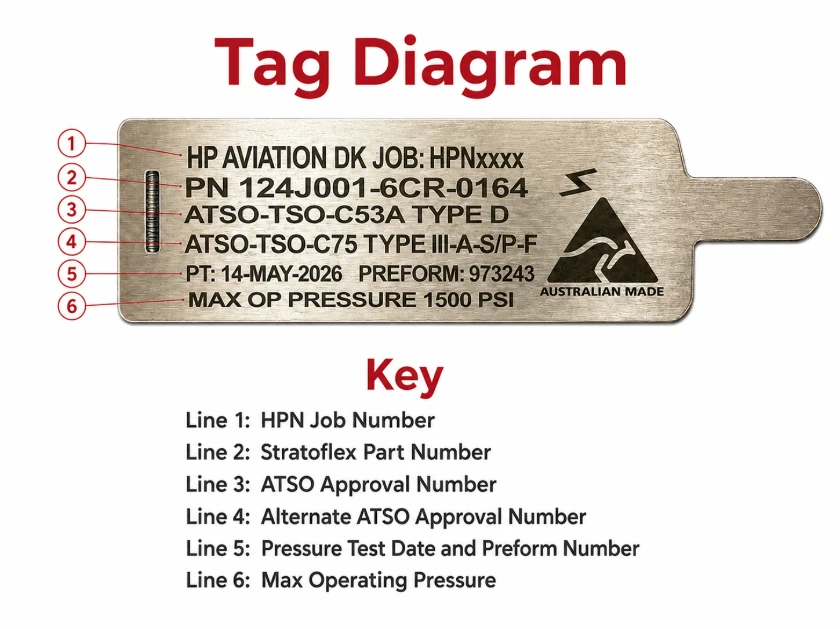
Each HP Aviation Hoses assembly is fitted with an engraved stainless steel ID band that records key traceability, approval, manufacturing, and test information.
ID Band Traceability Guide
Clean, Visible & Permanent Marking
HP Aviation Hoses uses a Fiber Laser to engrave our stainless steel ID bands, producing a clean, sharp, and highly visible finish that supports long-term traceability.
The ID band provides a permanent reference for the hose assembly, including the HP job number, part number, approval details, manufacturing information, test data, and maximum operating pressure.
Use the diagram to identify what each line on the tag represents when reviewing, ordering, or replacing a hose assembly.
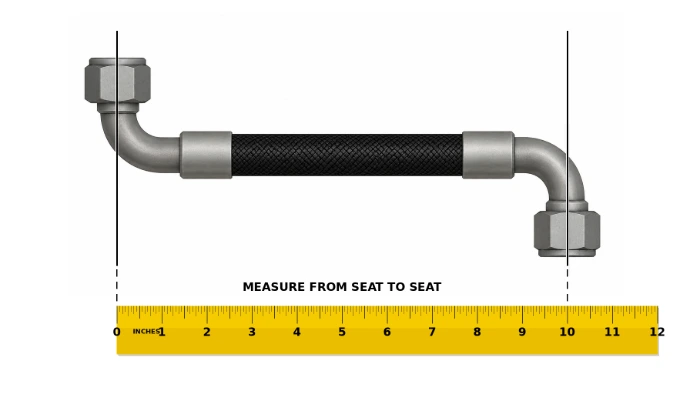
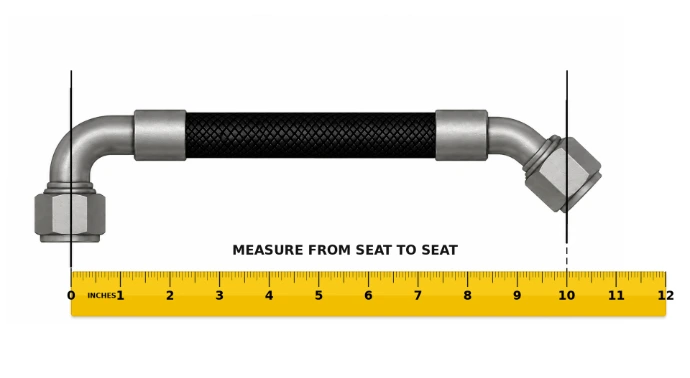
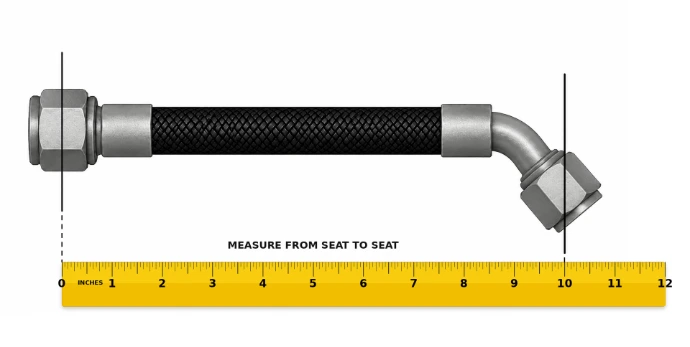
How To Measure Hose Assemblies
Use the examples below to measure hose assemblies from seat to seat. The black vertical lines show the correct measuring points, and the ruler shows the finished hose assembly length in inches.
90° to 90° Hose Assembly
Measurement Method
Measure from the seat of the first 90° fitting to the seat of the opposite 90° fitting.
Record length in: Inches
45° to 45° Hose Assembly
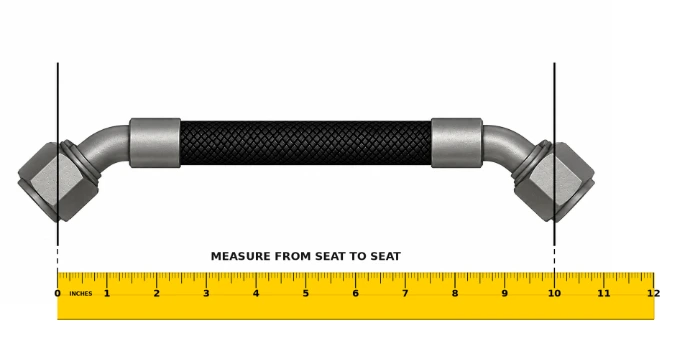
Measurement Method
Measure from the seat of the first 45° fitting to the seat of the opposite 45° fitting.
Record length in: Inches
90° to 45° Hose Assembly
Measurement Method
Measure from the seat of the 90° fitting to the seat of the 45° fitting.
Record length in: Inches
Straight to Straight Hose Assembly

Measurement Method
Measure from the seat of the first straight fitting to the seat of the opposite straight fitting.
Record length in: Inches
Straight to 45° Hose Assembly
Measurement Method
Measure from the seat of the straight fitting to the seat of the 45° fitting.
Record length in: Inches
Straight to 90° Hose Assembly
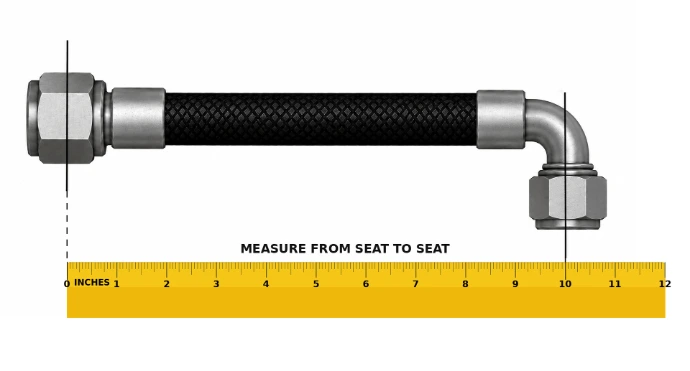
Measurement Method
Measure from the seat of the straight fitting to the seat of the 90° fitting.
Record length in: Inches
TSO & Product Charter Reference
This reference explains common TSO designations used with approved Stratoflex hose families, diameter ranges, and hose assembly applications.
What Is TSO-C53 / TSO-C53A?
Fuel and Oil Hose Assemblies
TSO-C53 and TSO-C53A are fuel and oil hose assembly references. The type letter identifies the temperature class and whether the hose is intended for use inside or outside a fire zone.
Type A
Non-fire resistant, normal temperature hose assemblies intended for locations outside fire zones where fluid and ambient air temperatures do not exceed 250°F. Commonly associated with rubber hose assemblies.
Type B
Non-fire resistant, high temperature hose assemblies intended for locations outside fire zones where fluid and ambient air temperatures do not exceed 450°F. Commonly associated with Teflon hose assemblies.
Type C
Fire resistant, normal temperature hose assemblies intended for use within fire zones. Commonly associated with rubber hose assemblies fitted with firesleeve.
Type D
Fire resistant, high temperature hose assemblies intended for use within fire zones. Commonly associated with Teflon hose assemblies fitted with firesleeve.
Additional TSO-C53 Line Types
Type 1 — Pressure Line
Hose assemblies intended for use in the line connecting the feathering pump outlet to the propeller.
Type 2 — Fire Resistant Supply Line
Hose assemblies intended for use in the line connecting the oil supply to the feathering pump where the entire line is located aft of the firewall.
Type 3 — Fireproof Supply Line
Same general application as Type 2, except the hose assemblies are located wholly or in part forward of the firewall.
Suffix Notes
Some Product Charter designations include suffixes such as P, S/P, or F. These suffixes should be read exactly as shown on the approved Parker / Stratoflex Product Charter and confirmed against the applicable production and release documentation.
What Is TSO-C75?
Hydraulic Hose Assemblies
TSO-C75 is a hydraulic hose assembly reference. The type identifies the operating pressure range and temperature rating for the hose assembly.
| Type | Operating Pressure | Temperature |
|---|---|---|
| IA | 1,500 psi or less | 160°F |
| IB | 1,500 to 3,000 psi | 160°F |
| IIA | 1,500 psi or less | 275°F |
| IIB | 1,500 to 3,000 psi | 275°F |
| IIIA | 1,500 psi or less | 400°F |
| IIIB | 1,500 to 3,000 psi | 400°F |
HP Aviation Hoses — Product Charter TSO Reference
The full Parker Stratoflex Product Charter is available as a downloadable PDF. This document includes the approved hose types, diameter ranges, and TSO designation references for HP Aviation Hoses.
Download Parker Product Charter PDFReference only. This document should not be used by itself as release authority. Confirm each assembly against the current approved charter, applicable CASA authorisation, production records, and release documentation.
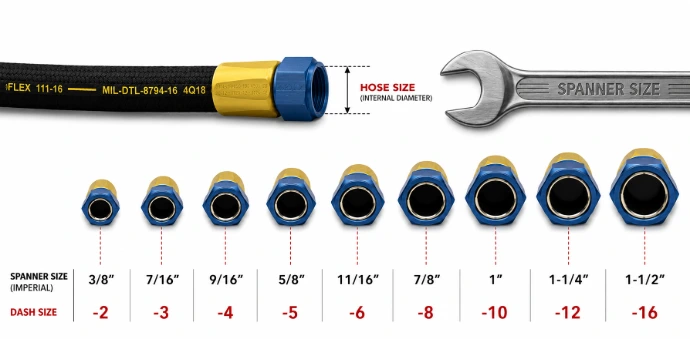
Spanner Size To Dash Size Guide
Use this guide to identify the correct hose dash size by matching the fitting nut to the correct imperial spanner size.